
System Science - Part 3: Analogue Connections
Answers To The Question, ‘How Many Ins & Outs Do You Need?’
When you’re deciding what audio interface to buy, it’s important that it can connect to your computer, and that its driver software will offer reliable, fast performance. But there’s more to the decision than that. Audio interfaces come in a bewildering variety of configurations, offering many different types of audio connector. You don’t want to waste money on features you’ll never use; and you don’t want to land yourself with an interface that can’t do what you need it to.
Let’s consider the other items you could connect to an audio interface. You might want to record audio from microphones, electronic instruments such as keyboards, samplers and synthesizers, guitars and basses, and perhaps turntables. At the other end of the chain, you may want to hear that audio over loudspeakers or headphones, or perhaps route it out into an outboard compressor, equaliser or effects unit. What most of these items have in common is that they deal in analogue signals. To the physicist, sound is pressure waves in the air. An analogue signal represents these as a varying electrical voltage that corresponds (is “analogous” to) to the peaks and troughs in those waves. This stands in contrast to the digital information that passes between the audio interface and the computer, which consists of a series of numbers.
Parallel Lines
Electronic instruments and studio outboard typically pass these signals to each other at what is called ‘line level’, where the loudest peaks in a signal might reach a few tens of Volts. This is a convenient standard for conveying audio cleanly from source to destination, and it’s also roughly what the analogue-to-digital converters in our audio interfaces expect to work with. However, not all the devices that make and capture sound can generate such a wide voltage swing. Most electric guitar pickups and many microphones are passive devices that convert sound energy to electricity but don’t amplify that signal before passing it on; and since there isn’t actually very much energy in sound waves, the electrical output from a pickup or microphone might peak at a few tens of millivolts. A signal like this needs to be ‘pre-amplified’ before it’s passed to an analogue-to-digital converter or a line-level device.
At these very low levels, various factors come into play that are not usually an issue with line-level signals. One such is impedance, the tendency of a circuit to oppose the flow of an alternating current. Impedance is measured in Ohms and varies with frequency; where you see an impedance measurement given, the value quoted is usually for a 1kHz sine wave signal. Most guitar pickups are designed to be connected to devices presenting a very high input impedance of at least 1MΩ; connect them instead to a typical microphone input, which presents an impedance of perhaps 1.5kΩ, and the sound is likely to be compromised.
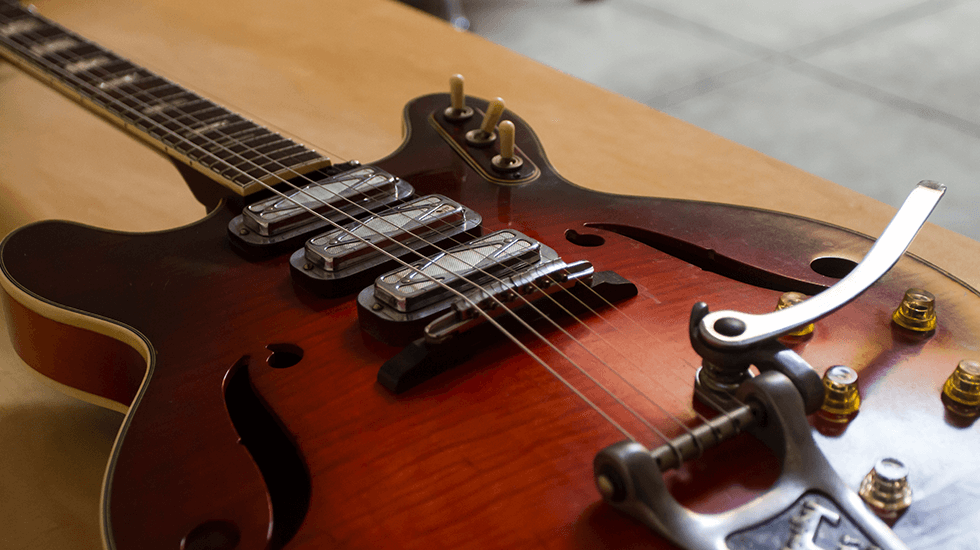
Most guitar pickups are very simple passive devices that will only work as intended when connected to an input presenting a very high impedance.
Another issue that can arise with any analogue signal, but especially with low-level signals, is interference. We’re surrounded by devices that generate electromagnetic fields, such as the ‘wall wart’ power supplies that come with many bits of studio equipment. If these are placed near cables carrying an audio signal, these fields will generate electrical energy in the cable, which will be audible as hum or buzz imposed on the wanted signal. Sensible placement and routing of cables can help to keep interference to a minimum. So too can the use of ‘balanced’ cables and connectors, which are standard on a lot of audio equipment. The idea behind balancing is that, as well as a ground or screen connection, we run the wire carrying the signal alongside a second wire that will pick up the same interference. The destination device then ‘sees’ not the absolute voltage in the signal wire, but the difference between the voltages of these two wires, meaning the interference is cancelled out and we are left with just the wanted signal. Creating a balanced connection requires a connector with three electrical contacts rather than just two.
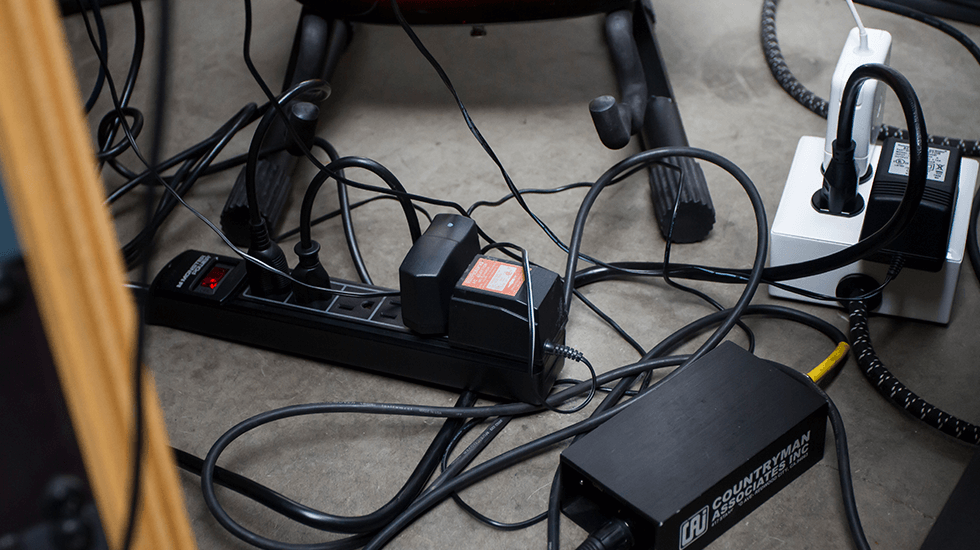
Modern studios are full of potential sources of induced hum and buzz. Using balanced connections helps to keep this to a minimum.
Jacks And XLRs
Two main types of connector are used to transfer analogue signals. One is the quarter-inch (6.35mm) ‘jack’. Cables of this form have identical plugs at either end, and are reversible; the devices they connect have identical sockets on input and output. Jack connectors and cables can be balanced or unbalanced, and you can tell which is which by inspecting the plug. The additional wire in a balanced connection is linked to an extra ring on the barrel of the plug. It is thus called a TRS connector, for ‘tip-ring-sleeve’, while the unbalanced version is just a TS. Depending on how balancing is implemented, using an unbalanced cable to join a balanced input and output may work, as will the opposite arrangement, but you’ll only get the benefits of balancing if all three are balanced.
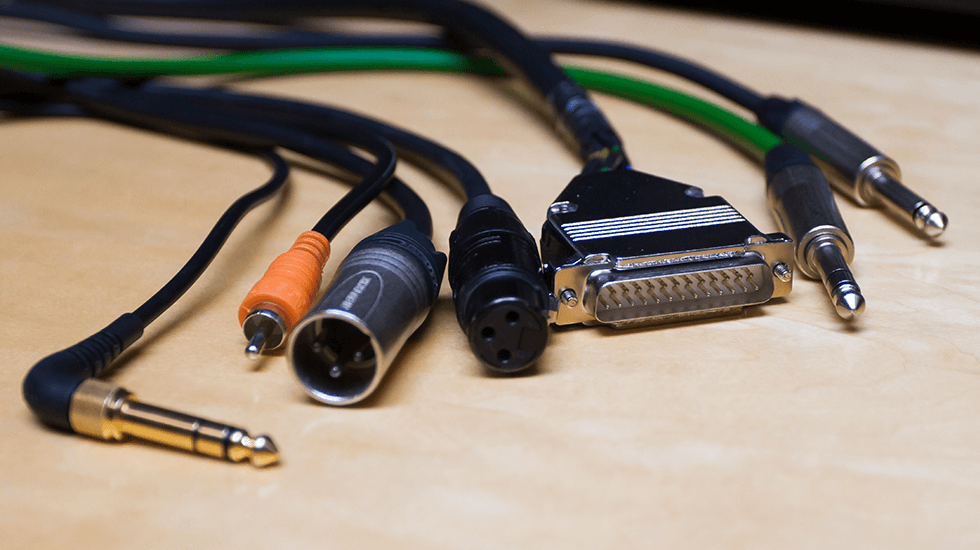
Audio connector types (left to right): A stereo quarter-inch cable — as found on the end of a headphone cord. An RCA plug, used for unbalanced connections. Male XLR. Female XLR. DB25 connector (aka D-Sub).Quarter-inch TRS (Tip Ring Sleeve) connector, for balanced connections. Quarter-inch TS (Tip Sleeve) connector, for unbalanced line-level connections and instrument.
The other type of connector in universal use is the XLR. Unlike the jack, this is a ‘gendered’ connector, and XLR cables typically have a ‘male’ connector at one end and a ‘female’ one at the other. The male connector has a circular barrel enclosing two or more pins, which mate with corresponding sockets in the female connector to make an electrical connection. XLRs are available in many different configurations, but the only one widely used in audio is the three-pin version, which is almost invariably used to create a balanced connection. The usual convention is that signals are output on male XLRs, with input sockets being female. In practice, microphones almost always have XLR connectors, while guitars and basses use unbalanced quarter-inch jacks. Line-level connections are most often made using balanced quarter-inch connectors, though it’s also fairly common for studio gear to use XLRs and, occasionally, unbalanced connectors.
Three-way connectors don’t have to be used to transfer a single balanced audio signal. Alternatively, they can be made to carry two separate unbalanced signals. The quarter-inch TRS jacks used on headphones, for example, carry one stereo channel on the tip and the other on the ring, with the sleeve providing a common ground reference. Some audio interfaces also offer ‘insert points’ where a TRS jack combines an unbalanced output and input on the tip and ring.
You may also encounter a few other types of connector in use for analogue signals. RCA phonos are inherently unbalanced, and are mainly used on hi-fi equipment; a miniaturised 3.5mm version of the TRS jack connector is sometimes used, especially for headphones; and where many channels of audio need to be fitted into a small space, specialist multi-way connectors such as D-Subs and EDACs are employed. XLRs and RCA phonos are also sometimes used to transfer digital signals, as we’ll see in a future article.
Finally, analogue inputs on audio interfaces sometimes use the so-called ‘combi’ connector, which incorporates a TRS jack socket in the centre of a female three-pin XLR. These are usually configured so that the TRS socket accepts line-level signals while the XLR offers a connection point for mics; in some cases the TRS can also be switched into a high-impedance mode suitable for plugging guitars in.
Microphones, Gain & Phantom Power
As we’ve seen, the relatively small signals put out by microphones and guitar pickups require pre-amplifying to get them to the level where an analogue-to-digital converter can get to work on them. These signals also vary considerably in level in the first place: a capacitor mic used on a snare drum will put out a much ‘hotter’ signal than a ribbon microphone pointed at an acoustic guitar. For this reason, it’s essential to be able to vary the amount of preamplification that can be applied, so any XLR input designed for directly connecting a microphone will have a means of controlling the ‘input gain’. The amount of preamplification is usually set using a physical control that operates in the analogue domain, but some interfaces such as Focusrite’s Red 4Pre and Red 8Pre feature digitally controlled preamps. These have the big advantage that input gain can be set and recalled precisely, which is very useful when you want to match the amount of preamplification you’re applying across two channels for stereo recording, or in case you need to reproduce a particular recording setup later on. Sometimes a variable gain control works in conjunction with a ‘pad’ switch, which applies an additional fixed degree of attenuation to help cope with very ‘hot’ signals. Many interfaces that have microphone preamps also offer useful ways of processing the input signal. These can include high-pass filters, which remove unwanted rumbles and other low-frequency noise, and switches to reverse the polarity of the signal. Some interfaces also feature the ability to vary the input impedance of the preamps, which can introduce subtle changes to the tone with some types of microphone; this is part of what the Air controls found on Focusrite’s Red and Clarett interfaces do.
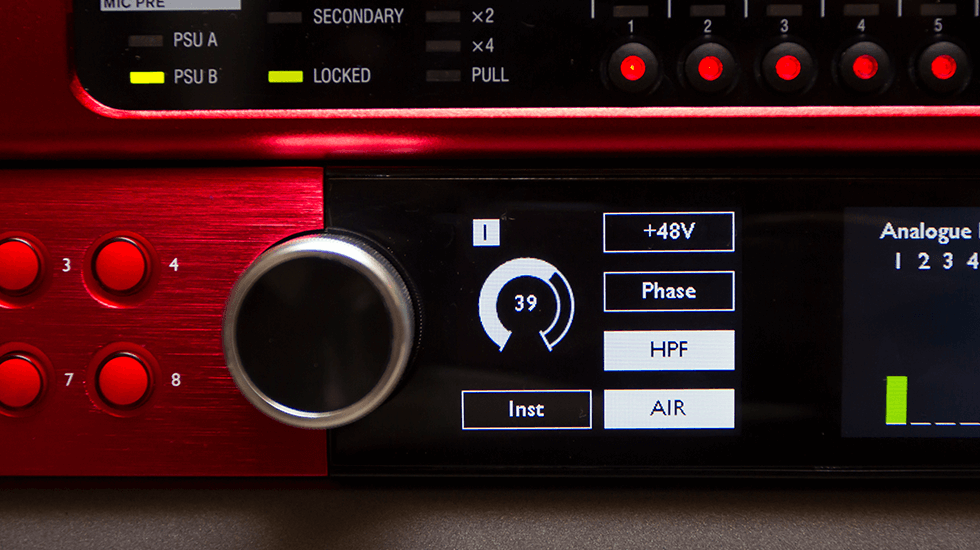
Because the signal levels coming from microphones can vary widely, microphone inputs let the user vary the amount of preamplification that is applied to bring them up to line level. The preamps on Focusrite’s Red 8Pre interface also feature phantom power, high-pass filters, polarity/phase reversal and Focusrite’s unique Air control.
Finally, capacitor (‘condenser’) microphones need to draw power in order to work. This is usually supplied by means of a standard called ‘phantom power’, so called because it is carried on the same cable that connects the microphone without affecting the mic signal. Almost all mic preamps built into recording interfaces can supply +48V phantom power, but some allow it to be switched on and off for individual channels, while others make this a global setting. You are usually advised to leave phantom power switched off for mics that don’t need it, especially ribbon mics, though the risk of damage is not as great as it’s often made out to be. Interfaces that draw their own power solely from the host computer over USB or Thunderbolt are often limited in their ability to supply phantom power to microphones. They can also struggle to drive some headphones as loud as you might wish.
Connector To Computer
Inside an audio interface, the analogue inputs feed analogue-to-digital converters, each of which generates a stream of data that can be recorded on the attached computer. At the other end, digital-to-analogue converters feed the analogue outputs, which can be connected to headphones, loudspeakers and other studio gear. However, there isn’t always a one-to-one correspondence between connector, converter and recording channel. If an interface offers eight XLR inputs, it will certainly have eight A-D converters and recording channels, allowing the signals from up to eight microphones to be recorded simultaneously to separate tracks. However, if that same interface also offers eight jack inputs, these might share the same converters and recording channels, in which case you couldn’t also record eight line-level sources at the same time as recording the mics. On the output side, two headphone sockets might each have independent D-A converters, allowing them to be addressed separately in your recording software; but they might not!
What Do You Need?
To sum up, then, on any audio interface you’re likely to find some combination of the following analogue connections: balanced line inputs and unbalanced instrument inputs on quarter-inch jacks; microphone inputs on female XLRs; balanced line outputs on jacks or male XLRs; and headphone outputs on stereo, unbalanced jacks. So how many of each should you be looking for?
There are a lot of musicians and producers whose needs are fully met by quite a modest selection of I/O. For example, let’s take the case of someone who produces mainly electronic music, and whose sound sources are all software synths and samplers. Good low-latency performance and high-quality audio output are essential, but such a musician might have little need for audio input at all, and require only a stereo output to feed loudspeakers and a single headphone socket for mixing late at night. At the other end of the spectrum, someone who’s recording live bands using a large-format analogue console will need large numbers of line inputs and outputs to handle all the channels.

If you mainly make electronic music and your sound sources are all software-based, all you really need is a headphone socket and a stereo output to feed loudspeakers.
To help you evaluate your own needs, it’s worth asking yourself the following questions:
"What other recording hardware do I want to integrate with my interface?"
If your studio setup is going to consist only of a computer plus interface, with mics, instruments and loudspeakers attached, it’s vital that that interface can do everything you need of it. Unless you planned for the possibility when buying your interface, you’ll be stuck when you suddenly find yourself needing an extra mic or headphone feed in mid-session. On the other hand, if you’re going to be pairing your audio interface with an analogue mixer or with outboard mic preamps, you might actively prefer to not have preamps on the interface itself. Likewise, if you’re connecting multiple pairs of speakers to a single interface, you’ll need two line outputs for each pair of speakers you connect — but you might choose instead to use an outboard monitor controller, in which case you’ll only need to feed it a single pair of outputs. On a related note, very few audio interfaces have more than two headphone outputs built in, so if several musicians are going to want to plug headphones in simultaneously, or in a different room, you’ll need to add an external headphone amp, which will require its own pair of line outputs from your interface. You may even want to set up different monitor mixes for different musicians, or to provide stems so that each musician can create his or her own cue mix, in which case further line-level outputs will be required. As well as mixers and mic preamps, many people also have other hardware studio equipment that they want to integrate into their setup. For example, some people like to place compressors and equalisers in the input chain so that the sound they record is already processed in a way they find pleasing. Others want to incorporate such studio hardware at mixdown, so that tracks from their recording software can be sent out to rackmounting processors or even guitar pedals.
If you want to integrate studio outboard into your computer recording system, you’ll need to make sure your interface has enough of the right inputs and outputs.
Some advocate the use of an external ‘summing mixer’, which takes the key elements of your mix on separate inputs and combines them in the analogue domain. Studio processing and effects units almost invariably work with line-level signals. If your input signal is already at line level before it reaches your interface — as it will be if you’re using an external mic preamp, or if that signal is coming from a keyboard or sampler — you can easily run it through additional hardware before it meets the line inputs on your interface, in order to record it with compression or EQ. However, if you want to process the signal prior to recording using an external compressor or equaliser, but you don’t have a separate mic preamp, you’ll need an interface with insert points, so that these devices can be ‘patched’ into the line-level path between the interface’s mic preamp and its A-D converter. To incorporate external studio hardware at mixdown, you’ll need a spare line-level input and output for each channel of hardware you’re using — some hardware processors are mono only, others expect a stereo input, and some will deliver a stereo output from a mono input, while a summing mixer might take eight or sixteen line inputs and combine them to a single stereo output.
"How many inputs will I need to record simultaneously?"
Many musicians own multiple microphones, keyboards, guitars and other sound sources, but depending on how you work, you might need many fewer inputs to connect them to. For example, if you are a guitarist who is only ever likely to be working alone in the studio, you might never need more than two simultaneous inputs into your recording software — no matter how large your guitar collection, you can only play one of them at once! The same might be true of a keyboard player, too, but not necessarily: you might decide you want to use a sequencer to play multiple synths and sound modules at once. If that’s the case, you’ll need either sufficient line-level inputs to plug them all in at once, or an external mixer.
Most techniques for miking drums involve a stereo pair to capture the whole kit plus spot mics on bass drum, snare and toms, so if you’re going to be recording drum kits on a regular basis, eight XLR inputs is a sensible minimum.
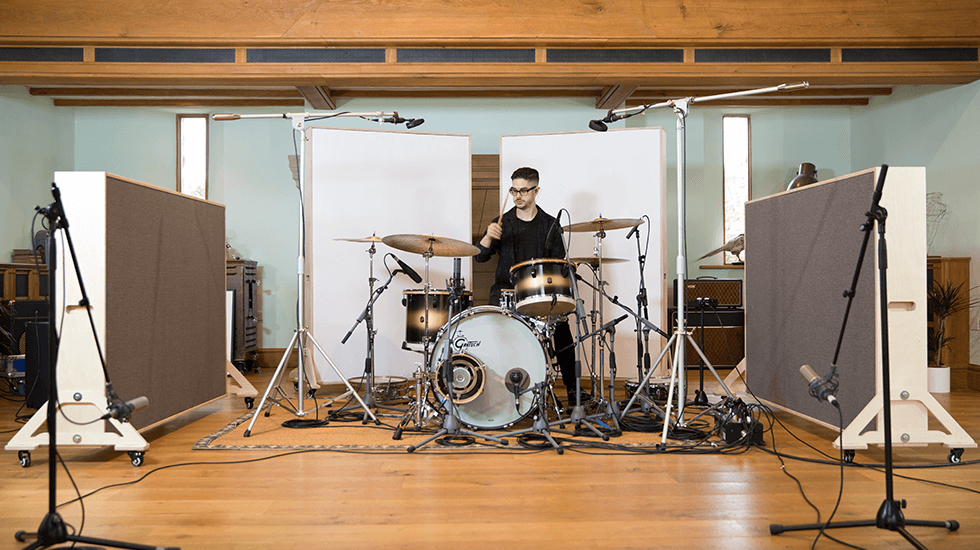
Standard recording techniques for rock and pop drums require multiple microphones. An interface with eight mic inputs should be sufficient for most needs, although elaborate setups such as this may need more.
For tracking an entire band live, you can probably double that figure at least, but there are few single audio interfaces that have more than twelve mic inputs built in. Recording on this sort of scale is more usually catered for either using modular systems such as Focusrite’s RedNet range, which allows additional mic preamp units to be added as needed, or by using an analogue mixer as a ‘front end’ for an audio interface with lots of line inputs. Audio interfaces naturally get more expensive as you add more analogue inputs and outputs, so if you anticipate that you might want to do more ambitious projects further down the line, a sensible approach is to invest in an interface that meets your current needs but offers potential for expansion at a later date. Fully modular systems such as RedNet or Pro Tools HDX offer the greatest flexibilty in this department, but many other interfaces offer ways of adding further analogue inputs and outputs. For example, S/PDIF, ADAT and MADI digital sockets allow additional preamps and A-D or D-A converters to be attached, and some interfaces can be ‘aggregated’, meaning that you can connect multiple units together to create one ‘super interface’. We’ll be explaining these expansion options in more detail in the next part of this series.
Further Reading: Set To Surround
For many years, surround sound was only really needed for large-scale film and TV production, but there are signs that it is at last becoming more relevant to project studio owners. If you’re going to mix in surround, you’ll need an interface that has an analogue line output for each speaker you plan to connect — for a typical 5.1 setup, that means at least six analogue line outputs, along with another pair for a separate stereo reference if you like to work that way. It’s also worth making sure that any volume control on the interface can be configured to work across all of the analogue outputs at once, not just the first pair.
Further Reading: Connecting Turntables
Many people want to record from a record player, either for sampling or for converting their vinyl collection to digital form. However, if you simply connect the audio output of a turntable to a pair of line inputs on your audio interface, you’ll get very disappointing results: not only will the signal be too quiet, but it’ll sound very thin, and may be plagued with buzz and hum. To overcome some of the limitations of vinyl as an audio format, treble frequencies are heavily boosted when a record is cut, and the correct frequency balance is restored on playback, when preamplification is also needed to bring the signal up to a healthy level. Many turntables also have a separate ground wire which needs to be connected to an earthing point to eliminate mains hum. If you have a hi-fi system that includes an amplifier with turntable inputs, all of these features will be built into that, and you should record the line output from the amplifier rather than connecting the turntable directly to your audio interface. If you don’t, you’ll need a separate phono preamp.
Words: Sam Pryor